
Elden Ring is finally here and has taken the gaming community by storm. After receiving one of the highest review scores of all-time (my spoiler-free review here), players around the world have been enamored with it and we’re here to help with our guide!
However, there are seemingly millions of new players to the game who haven’t experienced a From Software title before. And the game does share a lot of DNA with Dark Souls. In that vein, there are quite a few things that may not seem clear or be understood. Most importantly, there are several key items at the start of the game that you can completely miss!
Fear not, I’m here to help. As a Souls-veteran and someone who, either amazingly or sadly, has over 120 hours in the game as of this writing, I’m going to explain a lot of key information. This won’t be a comprehensive guide by any means as that would take days. Rather, this will cover the core concepts of the RPG elements and the beginning of the game. Let’s get to it.
I will continually update this as well so consider it a work-in-progress
Picking a Class
Upon first starting, you’ll be asked to pick a class. Picking your class is very important and will help define your character’s build the rest of the way. Here are a few tips:
- Think about what type of character you want to be. Do you want to be an agile warrior who swings a smaller sword quickly? A spell-casting mage? A healing cleric? A giant who swings massive weapons? You have a lot of options here, and most build-styles from fantasy-RPGs can be built into.
- Recommendation: I believe new players should go “sword and board” as a shield can save your life countless times in Elden Ring. Therefore, I typically recommend Vagabond or Samurai and to focus on Vigor, Endurance, and either Strength or Dexterity over the course of your playthrough.
- You can have multiple save files and characters, so don’t be afraid to build, experiment briefly, and start over again. It’s all part of the fun.
- Customization of your character’s look is extensive, but it doesn’t impact any of your stats nor the story. So feel to create whatever atrocity you’d like.
- Recommendation: The Keepsake is just a single item that you can begin the game with. It’s not critical, so don’t panic. However, I recommend new players take the Golden Seed. These are used to increase the number of flasks you can carry. Being able to start the game with an extra healing flask can come in handy.
- Here’s an overview of each of the classes courtesy of the Future Press guide.

Starting Out
When you first begin playing, Elden Ring throws a few things at you, including a short tutorial-style dungeon. It’s short but effective, and it will teach you basic concepts.
- You will be immediately met by a giant, multi-armed monstrosity who will make short work of you. Don’t fret, you’re supposed to die. This is FromSoft welcoming you to the game. *smirk*
- You will then be thrown into a cave. As you begin to walk forward, you’ll see a spirit in a chair. Speak with him, and he will say to “Take the plunge.” If you look down, you can see a path to jump down to. Do that, and it will begin the very short tutorial dungeon.
- It will teach you a few key concepts, some of which are new to FromSoft games. Let’s cover them:
- Jump Attacks: Taking from Sekiro, you can now jump attack. You can do this with either the R1 (light attack) or R2 (heavy attack) while mid-air. These are very useful to break enemy’s posture and to overcome their defenses when they are using things like shields.
- Guard Counters: My favorite addition, and it’s one to take note of particularly if going sword and board. While blocking, let an enemy attack you and, after you block their attack with your shield (holding L1), immediately hit your heavy attack (R2). You will hear a special sound and do a counter heavy attack. These do big damage and also can often break an enemy’s posture completely. They are priceless. But be warned: you are not immune while swinging, so timing is important too.
- Sneaking: Stealth plays a big role in Elden Ring. You can often sneak around enemies without having to fight them or to get a jump on them to do some big damage. Simply click the left thumbstick to sneak (or whatever bind you have on PC). Sneak attacks often open up backstabbing opportunities, which do critical damage. Just sneak behind an enemy and, when directly behind them, hit your light attack (R1).
- After you complete the tutorial dungeon, head up the lift and out into Limgrave for the first time. Don’t worry about the fog wall you pass along the way. We’ll come back to that.

Key Items You Don’t Want to Miss at the Beginning
FromSoft games are different from most modern games as they put the onus on the player to listen closely, read item descriptions, and discover things on their own. Some love this, some don’t. We’re not here to discuss that, but, rather, I’m going to help you get off on the right foot as there are several key items that you can actually miss at the beginning of the game.
- When first setting out into Limgrave, don’t walk forwards, but instead go around the back of the building you came out of. Come on, any gaming veteran knows you always start by going the opposite way a game points you! There are a few additional crafting plants behind the building, including a more rare one. They’re good to grab right away.
- Now walk back in front of the building towards the yellow light on the ground. This is an area of Grace, which acts similarly to bonfires in Dark Souls. Activate it, and speak to the NPC. He will provide some story elements and then tell you to be on your way.
- Key Item: Directly to the right of the spot of Grace, as you walk down the hill, is an effigy. These are used in the multiplayer/co-op. Make sure to pick that up.
- You will now see a giant enemy on a horse in front of you. Don’t worry, as, with most enemies in this game, you don’t have to fight him. Simply stay out of his path and head to the church directly north.
- Key Item: Walk into the church, activate the spot of grace, and speak with the merchant. If you choose the option to speak with him, he will recommend buying a crafting kit. Do this right away as this will open up your item crafting in the menu. This is the Church of Elleh, which you can see below.
- Also, rest at the spot of Grace. Any time you are at a spot of Grace and see an option for “Speak to Melina,” select it. She is a key character through the game and will not only provide important information, but items as well.

- If you look at the map, certain spots of Grace will have a beam of light pointing in a specific direction on them. You can also see this in the game as light shining in a direction. These show you the direction to head for the critical path and important areas. So if you’re ever confused as to where to go next, follow their guidance.
- With that in mind, you want to head north through the trees until you reach a big camp of soldiers. You can go to the far left and head to the spot of Grace without being seen. Activate that, and rest.
- Key Item: Speak to Melina at this spot of Grace, and she will introduce you to the spirit horse, Torrent. She will give you his whistle, so put that in your equipment with your flasks as you’ll use him endlessly throughout the game. You can call Torrent anytime you are in the overworld – even during combat or in some boss battles.
- Key Item: Right in the middle of the camp you will see a small tower with an item below it. That is the first map marker, and you’ll want to get it immediately. You can fight the camp and get it, sneak to it, or simply ride Torrent over it and run. You can typically grab any item in those ways, so do whatever you feel is best in the moment.
- There are many map fragments throughout the game that you’ll want to find to fill in the map. When entering a new area that isn’t filled in, the game often gives you a small hint as to where to find the map fragment. If you zoom in, you can often see a very small icon for the map tower. Set a waypoint and head there first. They look like this when zoomed in:

- Key Item: Don’t leave the camp just yet, however. Looking south from the spot of Grace, on the right side, behind a wall and in-between some of the soldiers, there is a stairway down to a little cave. In there is a treasure chest that contains the Whetknife. This is what allows you to use Ashes of War (will explain shortly).

- From this point on, you’re essentially free to explore at will. But wait! There are a couple more essential items that you can miss. Let’s get those first.
- Key Item: Ride or fast travel back to the Church of Elleh. If it’s not night time, rest at the site of Grace and use the “Pass Time” option to wait until night time. At this point you should be spoken to by Renna, a blue, witch-looking character. She will introduce herself and give you the Spirit Bell. This allows you to use Spirit Ashes (will explain shortly).
- Note: it seems that Renna doesn’t appear for a small percentage of players at the time of writing this. We’re not sure why, but if she doesn’t, you can eventually buy the Spirit Bell from the Twin Husks at the Roundtable Hold, which I’ll explain below.
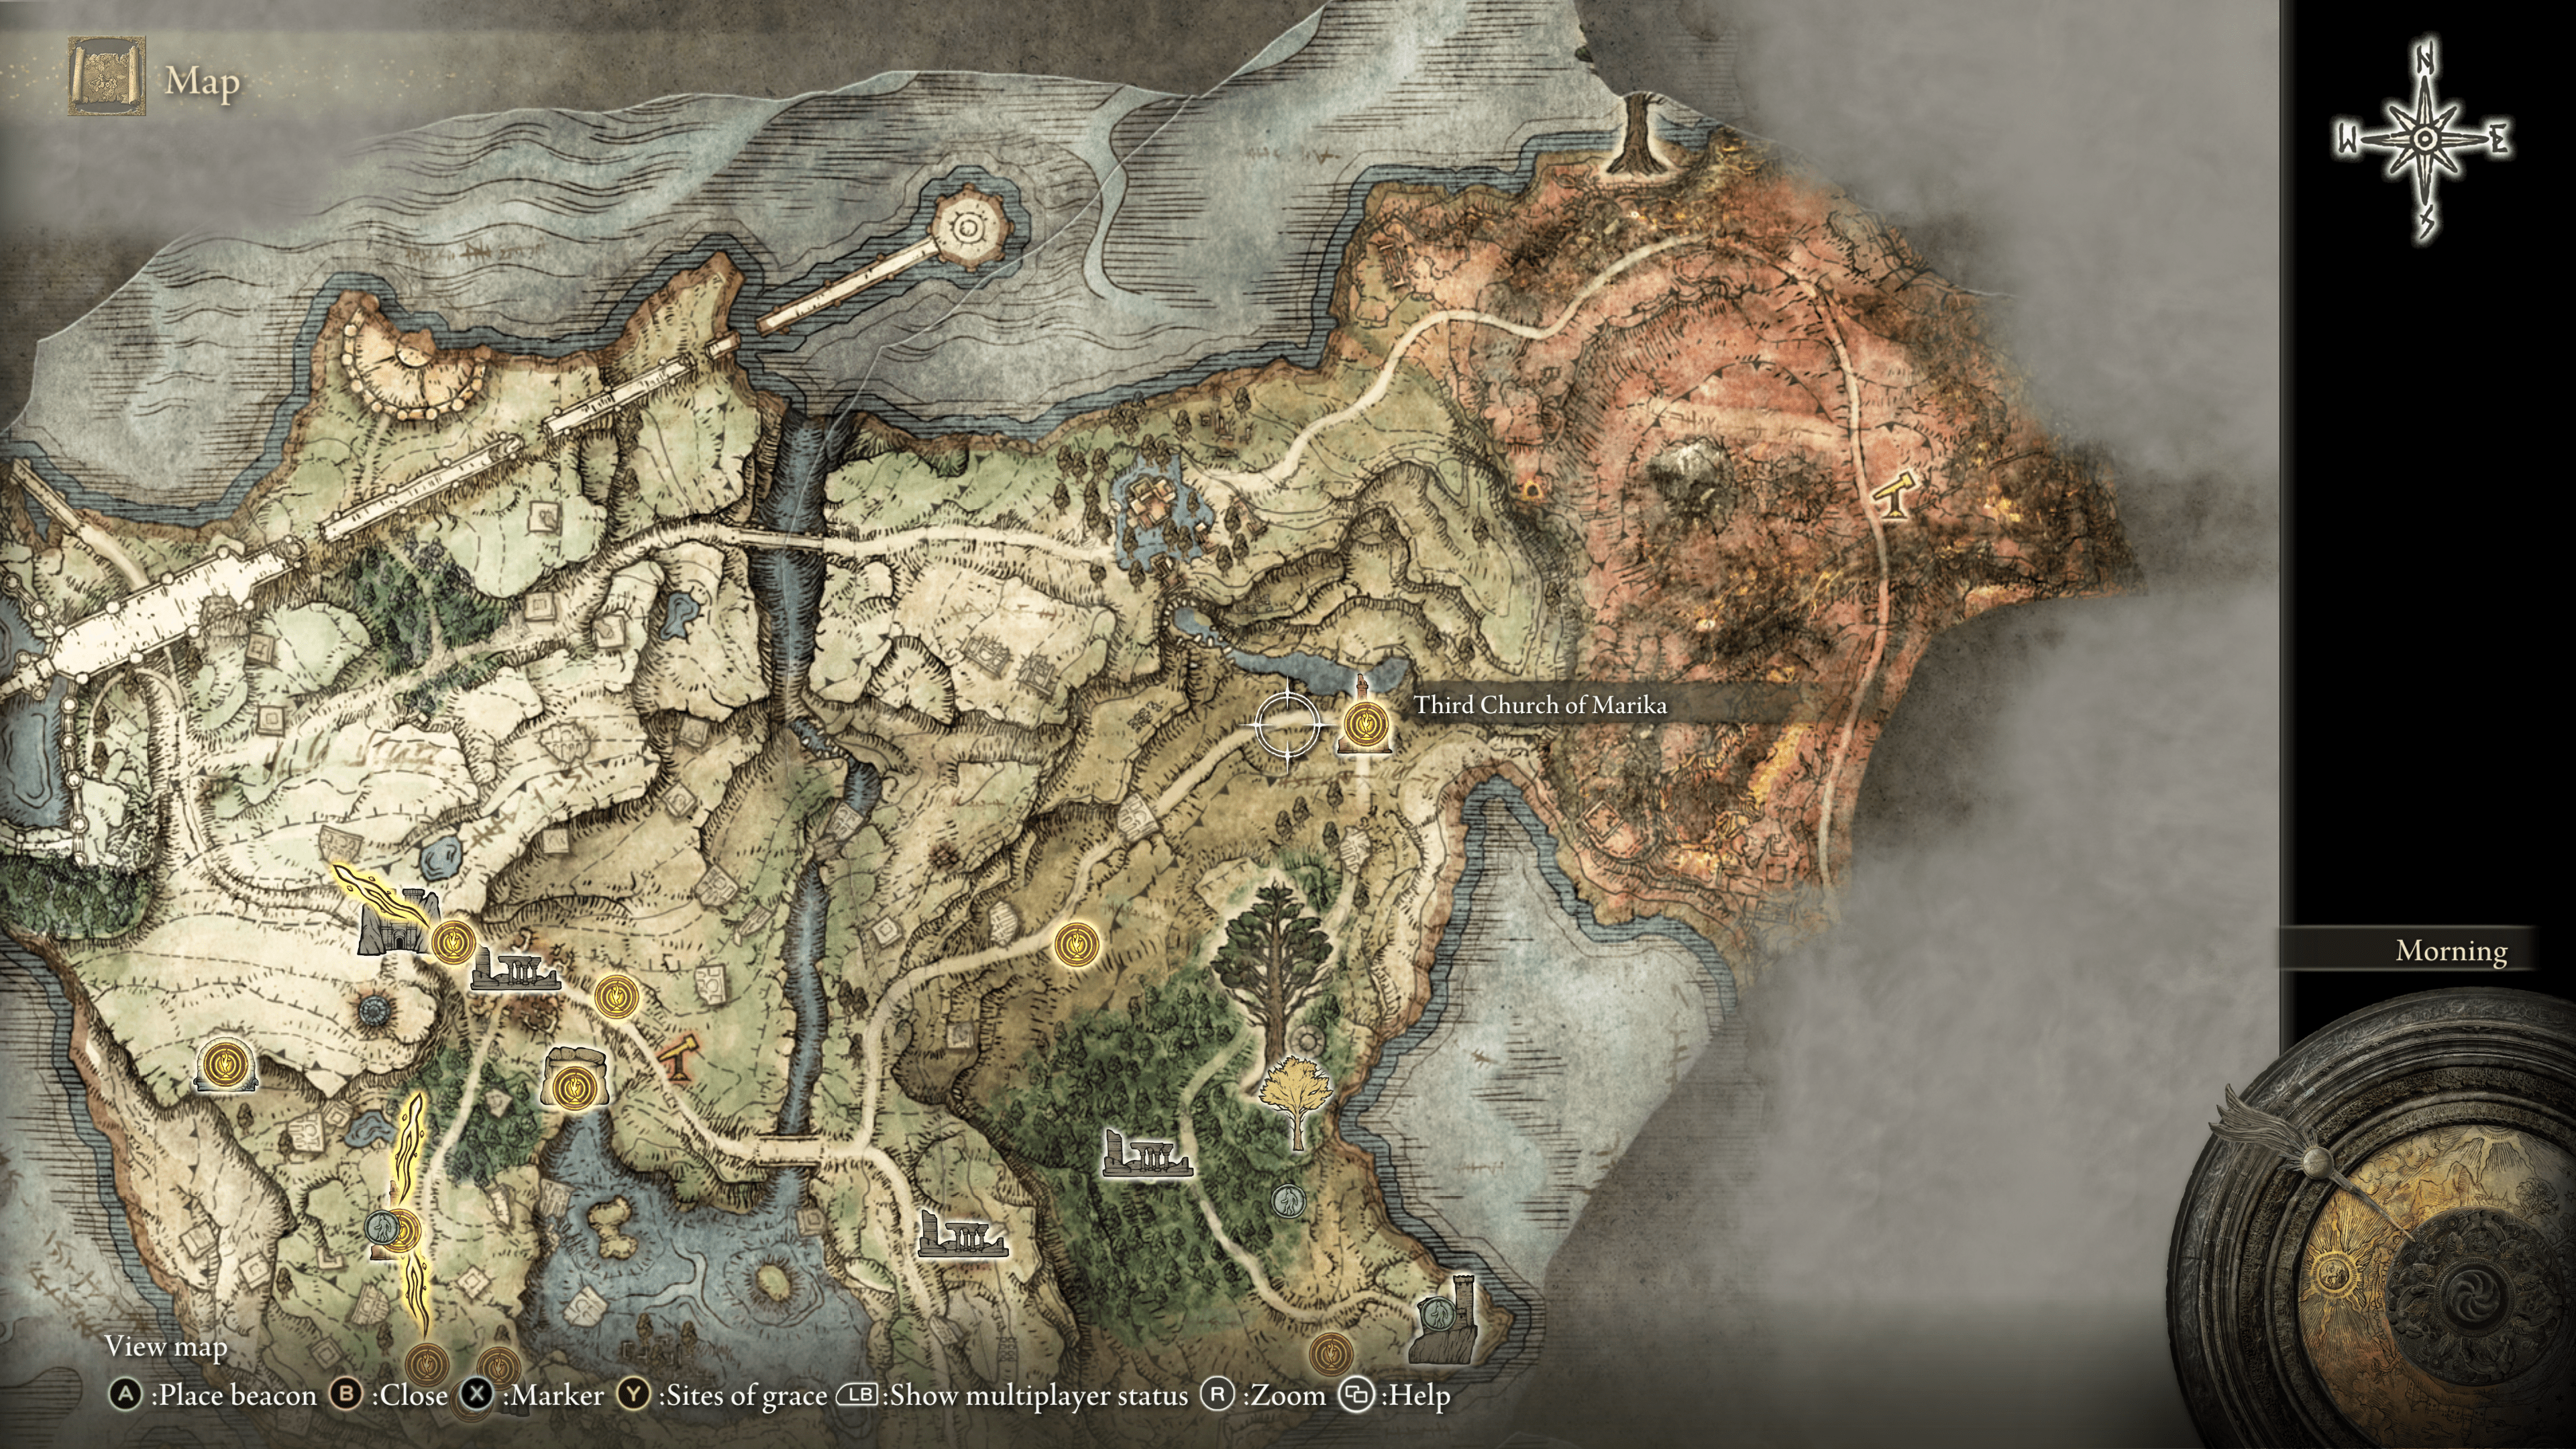
- Key Item: The last key item we want to get is the Flask of Wondrous Physick. The merchant in the Church of Elleh sells a hint as to where to find it, but save your runes. The Flask of Wondrous Physick is a unique flask that you can mix different bonuses into. It is single use, and it replenishes when you rest at a site of Grace, just like your other flasks. It’s a fantastic item and will help in the early game with some of the tougher battles. To reach it, you’ll head to the Third Church of Marika. It will be a bit of a ride, but worth heading to. Simply hop on Torrent and ride past every enemy along the way until you reach the church, which you can see below. You can follow the main road north of the lake.
- Key Item: While this is not a key item relating to specific abilities, I do consider it priceless for building your character. I will explain the Ashes of War in detail below, but, for now, you need to meet an NPC and buy a specific Ash of War from him.
- You can find him at the Warmaster’s Shack as depicted below on the map.

-
- Purchase the Ash of War named “No Skill” from him. Of course, you can come back and buy more later, but this is the one you want for now.

Important Concepts and Explanations
This section could easily be pages and pages long. It will be impossible to provide all of the information you can learn here, but I’ll cover some of the main questions I’ve been asked over the past few days.
- Equip Load: You have an equip load limit on your character. This means that, depending on what you have equipped, it can impact your stamina generation and agility. Equip load can be found in the middle of your status screen, and it functions as follows:
- If your EL is <30%, you are considered “light.” This gives you the furthest rolling distance and most invincibility frames to avoid enemy attacks.
- If your EL is >30% but <70%, you are considered “medium.” This gives you the standard roll distance and invincibility frames.
- If your EL is >70%, you are considered “heavy.” You’ll notice this immediately as you’ll feel clunky, and your roll (referred to in the community as the fat roll) will be slow and short. You generally don’t want this, so stay under 70% of your EL.
- Endurance is the attribute that governs your equip load. The higher your endurance, the heavier equipment you can safely hold/wear.
- Equipped usable items, arrows, and other miscellaneous items don’t impact your equip load. It’s only weapons, armor, and talismans that do. Also note: there is a talisman you can find that increases your equip load max.

- Weaponry and Attribute Scaling: Understanding the weaponry, how your character uses them, and how to optimize their use is critical.
- Weapons require certain attributes in order to use them effectively. In your inventory, highlight a weapon, and all of the information you need will be the middle of the screen.
- In the bottom right, you’ll find “Attributes Required.” This tells you what the minimum stat requirements are for each stat in order to use the weapon. If any of these are red, it means that you don’t have enough points in that stat to use it effectively.
- You can still equip it and use it, but you will do little damage and will not be able to do certain attacks.
- As you can see below, this character can’t use the Brick Hammer as it requires 31 Strength, and this character has 8 (all of your character stats are on the right hand side of the screen).
- In the “Attack Power” section in the middle, you can see that the weapon normally does 122 physical damage, but because of your stats, it’s subtracting 48 from that. Thus, this character’s stats make using the Brick Hammer ineffective.

- Ideally, you want to find weapons that you can not only use effectively, of course, but that scale with the stats you are building into.
- As you can see in the above image under “Attribute Scaling,” the Brick Hammer has a “B” rating for scaling with Strength, with no other attributes given a grade. That means it scales well with Strength, but it will benefit from no other attributes.
- On the contrary, on the equip screen below, you can see the character has a Banished Knight’s Greatsword equipped. It requires 17 Strength and 9 Dexterity, which the character has, and it scales only with Strength at a “C” rating.
- As you can see in the “Attack Power” section, the weapon does 137 physical damage, but because this character is a Strength focused character, it then gains an additional 43 damage. That is core damage plus the bonus for attribute scaling. Thus, the weapon’s total “standard” damage is actually 180.
- There are weapons that require all sorts of different stats, and they scale accordingly. Finding weapons that blend with your character’s stats and your play style is a big part of the experimentation in Elden Ring.
- Note that for Sorceries and spellcasters, you’ll see a Sorcery Scaling line. This works similarly where upgrading your staff/caster will increase the scale at which your spell’s damage increases due to that spell’s stats.

- Ashes of War: Ashes of War are unique skills that you can add to weapons, bows, and shields. They can also change the way equipment scales with your stats.
- As we noted in Key Items, you use the Whetknife to add Ashes of War to your equipment at sites of Grace.
- Ashes of War will act as your special attack through the L2/left trigger.
- When you equip an Ash of War on a weapon, it will sometimes ask you the type you want to use. This is how you can adjust the Attribute Scaling of the weapon, too.
- As you can see above, it displays the Banished Knight’s Heavy Greatsword. This is because I switched the sword to scale solely with Strength, which changes it to a “Heavy” weapon. Again, you want to align this with your character build.
- Looking below, you can see that by equipping the “Wild Strikes” Ash of War, I can keep it Standard or Heavy. By selecting Heavy, you can see it improves Strength Attribute Scaling from “D” to “C” and removes the Dexterity scaling. It then changes the damage output from 150+27 (Standard) to 137+43 (Heavy). While the core damage is lower, because it now scales with Strength better, this character gets an increased damage bonus. Thus, the combined damage actually rises from 177 to 180. And that gap will continue to widen as the character gets stronger.

-
- NOTE : If you have a shield equipped, your shield’s skill will overwrite your weapon’s skill. So, for instance, if you have a Parry shield equipped, hitting the left trigger will Parry. It won’t use your weapon’s skill attack.
- Some shields have “No Skill,” which then allows you to use your weapon’s skill instead.
- Or, because you’re reading this awesome guide, you can use the Key Item I had you get above, titled “Ash of War: No Skill.” Putting this Ash of War on your shield will cancel out its skill, allowing you to use any shield while still having access to your weapon’s skill attack on your L2/Left Trigger. Aww yeah…
- NOTE : If you have a shield equipped, your shield’s skill will overwrite your weapon’s skill. So, for instance, if you have a Parry shield equipped, hitting the left trigger will Parry. It won’t use your weapon’s skill attack.

- Spirit Ashes: Spirit Ashes are the spectral warriors/creatures you can summon to assist you in combat. They are fantastic, and you should always have them ready to go. You use these by having the Spirit Bell that you receive from Renna as I described above. You do not have to equip the bell. You simply have to have it in your inventory.
- Summoning them requires a specific number of Focus Points, which you can find in the description. Always ensure you have enough to summon the ones you have equipped.

-
- The easiest way to equip them is on your pouch. Hit start, and on the right hand side of the screen you will see your pouch. This allows you to hold Y/Triangle and push on the d-pad to use them.
- You can only summon them in specific areas. These are usually near a big battle in the open world, or during boss fights. This is signified by the glowing icon on the left hand the screen, as shown below.
- Note that during co-op sessions with live players, you cannot summon them, either.

Additional Key Information
- Flasks
- You use Golden Seeds to increase the number of flasks you can carry. You can do this at sites of Grace under the “Flasks” menu. The requirement for Golden Seeds increases as you play through the game. You will discover them nestled under the small golden tree locations that you can find around the map (typically when entering new major areas).
- You can allocate between Crimson Tear (Health) and Cerulean Tear (Focus Points) flasks at sites of Grace. For instance, if you have six total flasks unlocked, and you are an Astrologer who uses a lot of spells, you may want to carry three health and three focus point flasks.
- You can make your flasks stronger by using Sacred Tears. These are found within the churches throughout the world, so when you see a church, always head to it right away.
- The Flask of Wondrous Physick is priceless, and you can mix new abilities in it at sites of Grace. You will find these Tears by beating the mini-bosses located under each of the Minor Erdtrees throughout the world.
- Weapon Upgrades
- You can upgrade your weapons to +3 at the workbench found in the Church of Elleh at the beginning. After that point you will need to use a Smith.
- Smithing Stones are used to upgrade standard weapons up to +25.
- Somber Smithing Stones are used to upgrade special weapons up to +10.

- Multiplayer and Co-Op
- Elden Ring has a multiplayer menu when you hit the start button. Here, you can use specific items to play with other players.
- Look for the Martyr Effigy which you were introduced to right at the beginning of the game. These are usually found near large combat areas and boss fights.
- Using a Furcalling Finger Remedy will allow you see summon signs of other players. This will allow you to summon help into your game.
- To play with friends, specifically, you can setup passwords in the multiplayer menu. Use the same password as your friends, and you will only see their summoning signs, solely.
- There are a wide range of multiplayer focused items as you can help others, ask for help, invade and try to kill others, and more. Here’s a chart of all the multiplayer focused items and a description of what they do.
- Elden Ring has a multiplayer menu when you hit the start button. Here, you can use specific items to play with other players.

Tips for Exploring the World
- EXPLORE. This might be the most dense game world I’ve ever experienced. There are items, hidden areas, dungeons, unique enemies, and things to find quite literally everywhere. There is no rush to follow the path of Grace, and, in fact, I wouldn’t even recommend it. Explore, build your character, find key items, and enjoy for a while before trying to head to Stormveil Castle.
- For newer players, I recommend being at least level 20-25 before heading to Stormveil Castle.
- Hunt down churches. As I said above, each one will have a Sacred Tear in it, and having strong flasks that can replenish you will aid you greatly.
- After you take care of the key items above, head South to the Peninsula and West through Mistwood. These areas alone are large, and they include a wealth of gear and secrets, along with several NPCs you can meet.
- Listen carefully to the conversations you have, and always exhaust the dialog of Merchants and NPCs. They will often provide you with important information. Also, frequently revisit merchants and look for new conversation points – particularly the Church of Elleh at the beginning.
- There are several half-hidden NPC interactions in the early game. I don’t want to spoil these, so I’m not going to list them here just yet (and I likely haven’t even found them all). I will potentially add them at a later time, or you can reach out to me on Twitter to discuss.
- Use the Marker functionality of your map to note key locations for yourself. Noting where the Merchants are, bosses you want to come back to, dungeons you need to finish, etc., can be very helpful.

- Like an old-school RPG the map is designed in a way where you can look for new places to visit. While not explicitly marked, it will show you churches, forts, castles, dungeons, and a lot more. Take a close look, pick a point, set a waypoint, and go! You never know what you’ll find.
- The day-night cycle does play a role in the game world.
- Some enemies will only show up at night, while others will be more difficult.
- If you see enemies with golden eyes, that usually means they will provide you extra runes when you kill them. Be on the lookout for them.
- You can sneak better at night, allowing you to get much closer to enemies without being detected.
- Merchants will often sell a few key items that you should buy whenever possible
- Cookbooks will expand your crafting options. Always buy all of these. You can press the detailed view on them to show you specifically what each will open up in your crafting menu.
- Pots will allow you to craft bombs. The more pots you have, the more you can craft/hold. Pots are permanent – you simply craft them to use them when you need to.
- Swordstone Keys are used at the gargoyle statues to unlock the fog walls (such as the one in the beginning dungeon). You will often find rare items or special rooms behind these.
- You can fast travel to any site of Grace when in the overworld and not in combat.
- If you see skulls on the ground with their eyes lit up, it means they contain a rune. Attack it or walk over it with Torrent and simply mash the pickup button. This is a way to earn runes without entering combat.
- There are very few enemies you MUST fight in Elden Ring. If you simply want to get to an area or explore a specific location, you can just run or use Torrent to bypass the enemies there.

- It can help to take notes of NPC names as you meet them. You’ll often find characters being referenced later, and it’s very easy to forget who and where they’re talking about.
- You can often find smithing stones through the dungeons in the world. In particular, look for the “Mine” dungeons if you need smithing stones. You’ll see yellow rocks on the walls that you can collect.
- There are still plenty of ways to “cheese” enemies. Use doorways, stairs, and cliffs to your advantage!
- You’ll find gray stone areas in the open-world named “Evergaols.” Pronounced “Ever Jails,” they house arena-based boss battles. Some also tie to specific NPC quests…
- Feel free to collect as many crafting materials as you can carry. They don’t impact anything negatively, and it’s always handy to be able to craft what you need on the fly.

Early NPC Interactions
There are several NPCs you can meet in Limgrave some of which will have a large impact on your overall journey should you follow them through completion. Below I’m going to introduce you to several of them along with the initial steps to get them started. They are very easy to miss for new (or even experienced) players who don’t want to use a full guide. This is by no means a comprehensive list but rather, I’m hoping to simply help you along your way without spoiling too much.
Blaidd the Half-Wolf

- Blaidd is one of my favorite NPCs in the game and has a very long quest associated to him throughout Elden Ring.
- Interaction 1: To first meet Blaidd, you’ll want to head to the Mistwood Ruins. There you should hear a howling.

-
-
- After that, head back to the Church of Elleh (the first church you visited) and speak to the merchant again. You will be able to ask him about the howling in the woods to which he will respond and provide you with the “Finger Snap” emote.
- Head back to the Mistwood Ruins and use the Finger Snap emote. Blaidd will jump down and you can interact with him.
- Interaction 2: Blaidd can now be found next to the Forlorn Hound Evergaol where he will offer assistance hunting down an old enemy named Knight Dariwill.
-

-
-
- Summon him and fight the mini-boss in the Evergaol. After defeating him, you will be granted Bloodhound’s Fang (my current favorite sword in the game) and be able to continue Blaidd’s questline.
- Interaction 3: Blaidd’s third interaction occurs after speaking with Ranni the Witch. You will find her in the Three Sisters area after completing Caria Manor.
-
Alexander the Iron Fist

- Alexander, affectionately known as Pot Friend, is another fantastic NPC in Elden Ring.
- Interaction 1: To first meet Alexander you’ll want to head to the below location in Limgrave where you will find him stuck in the ground. It’s on the edge of the plateau just above the bridge. As he tells you, give him a good whack from behind!

-
- Interaction 2: To find Alexander again, you’ll need to visit the Gael Tunnel on the outskirts of Caelid. You can enter this cave from two different directions. Entering on the one end will allow you to speak to Alexander, but you won’t be able to open the door and continue his quest.
- Because of this, you’ll want to enter from the far side, work your way through the tunnel, and open the door to him from the outside. You can see the Gael Tunnel marker and the spot of Grace just Northwest of it below.
- Interaction 2: To find Alexander again, you’ll need to visit the Gael Tunnel on the outskirts of Caelid. You can enter this cave from two different directions. Entering on the one end will allow you to speak to Alexander, but you won’t be able to open the door and continue his quest.

-
-
- Upon doing so, you can then continue his dialog and he will move to his next location. FWIW, right next to the door is the cave boss battle which you can access from that site of Grace without fighting any enemies.
- Interaction 3: You’ll next find Alexander in Redmane Castle in Caelid before the fight against Radahn. Note that you can do this fight far later in the game. There is no need to rush there and in fact, it’s better to finish some NPC interactions before doing so.
- After the battle you’ll be able to speak with him again and he will then head to the Volcano Manor area.
-
Boc the Seamster

- Yet another NPC that adds functionality to the game and will stay with you for your entire journey, Boc is a Seamster who is easily missed in the early game.
- Interaction 1: To find Boc you simply need to head just down the road from the very first camp in Limgrave. He is disguised as a tree (which looks different from the other trees nearby) and as you approach, you will hear him calling out to you. You can find him on the map as shown below.

-
- Interaction 2: Boc will next be found in the Coastal Cave (shown below). He will be in the entrance and will tell you a story about the enemies in the cave. Conquer the cave including its boss and return to Boc at the entrance with his needle.

-
- Interaction 3: Boc will next be found next to the Grace just outside of Castle Stormveil after defeating Godrick. He will offer to become your personal seamstress which will allow you to customize some armor sets.
- Bonus: Head to the Church of Vows in Liurnia of the Lakes where you can acquire the Golden Needle. This will allow you to customize demi-god attire that you can acquire through the game!

Roderika

- Roderika plays an important role throughout the game but more than that, she plays a key role for the player early-on as well.
- Interaction 1: You’ll find Roderika in the Stormhill Shack on the way to Stormveil Castle. Exhaust her dialog and she will ask you to relay a message to her friends in the castle.

-
-
- continued: While in Castle Stormveil you’ll come across a slaughter area with a dead giant hanging above it. To reach it, it is positioned behind the multi-armed atrocity named the Grafted Scion. Be sure to visit it but careful of the dogs that will attack. Once you clear those out, grab the items and you’ll find a key item from Roderika’s now dead friends.
- continued: Before beating Godrick, revisit Roderika in the Stormhill Shack and give her the item you found from her dead friends. She will reward you with a Golden Seed. This is no longer possible after beating Godrick!
- Interaction 2: From here you’ll find Roderika in Roundtable Hold. Be sure to continually exhaust her dialog alongside the Blacksmiths as they have a questline that’s tied together!
-
Nepheli Loux

- Nepheli plays an interesting role in the game and her questline can apparently have different outcomes. I won’t speak about those here, but again will start you on your way.
- Interaction 1: Nepheli can first be found in Stormveil Castle in a side room before Godrick. You can find her in the below location and she can also be used as an NPC summon for Godrick as well.

-
- Interaction 2: Nepheli will next be found at the Roundtable Hold. Be sure to exhaust her dialog along with Gideons as they tie together.
- Interaction 3: At this point, Nepheli will next be found in the Village of the Albinaurics in Liurnia of the Lakes. She’s easy to miss and can mistaken for an enemy so play close attention!

-
- Interaction 4: After this point, Nepheli will play a role in a longer quest that ties into Ranni the Witch’s questline…
More to come on NPCs!


Very good guide! To the point and with recommendations. Thank you!
[…] Either just beginning or considering beginning Elden Ring? […]
[…] Spiel ist fordernd, aber erlernbar – Seasoned Gaming (Spiele-Guide-Seite) rät, vor Stormveil Castle Level 20 bis 25 zu […]